Setup#
On this page, we are going to look at the installation steps for the various tools needed to operate Qblox hardware. In addition, we will explain how to connect a Qblox cluster or SPI rack to your host PC.
Qblox Clusters will work out of the box with the qblox-instruments Python driver.
We will take you through the installation steps for creating a virtual programming environment for Python and installing the qblox-instruments
driver package, along with Jupyter (required to run the tutorials) and Quantify, a high-level Python framework to carry out quantum computing experiments.
Installation#
In this section, we will explain how to install the qblox-instruments package and set it up for use with Qblox hardware.
Qblox Instruments requires Python 3.8 or newer. We recommend using Python 3.9, the latest version supported by Quantify currently (see quantify-core, quantify-scheduler).
Tip for new Python users
For users new to Python, we recommend using Anaconda to set up your programming environment.
Please follow the installation instructions provided by Anaconda, and open up an Anaconda prompt when the installation is finished. We will start by creating a new environment, which we will use to install packages independently from other conda or Python environments. We can specify the name and the Python version of the environment. Type the following in Anaconda prompt (we chose my-env-name as the name for the environment which could be replaced with another name of your choice):
$ conda create -n my-env-name python=3.9
Then activate the environment by typing conda activate my-env-name. You are now ready to proceed with the next steps.
For a quick overview of useful conda commands, we recommend going through the conda cheat sheet.
System dependencies#
Qblox Instruments has one important system dependency, namely the HDF5 library. If this library is not installed on your system yet, please follow the installation instructions on the HDF5 website.
New users of HDF5 should download the latest version for their operating system under the section Pre-built Binary Distributions.
Note
(Windows only) If, after installation of the HDF5 library, you run into errors regarding Visual Studio C++, please install Microsoft C++ Build Tools as well.
Qblox Instruments#
The qblox-instruments driver package can be installed through pip, by executing the following command (make sure you have activated the correct environment using conda activate my-env-name):
$ pip install qblox-instruments
This will install the most recent version of the driver package. Please make sure that the driver version you install is compatible with your Cluster firmware, verify via the driver changelog on PyPi. For information on the firmware and driver updating procedure, see section Updating.
To install a specific version of the driver package, execute the following command:
$ pip install qblox-instruments==<version>
Tip
You can query your installed version by executing $ pip show qblox-instruments.
With qblox-instruments, two command-line tools will have been installed in your environment: Qblox Configuration Manager and Qblox Plug & Play.
We will be using these tools in the next step of connecting to your device(s): Connecting to a Cluster.
In addition, you might have noticed the QCoDeS dependency, which is the experiment and data acquisition framework used to control the Qblox hardware.
Jupyter-lab#
Our tutorials are run on the interactive ipython platform called Jupyter.
We recommend installing jupyter-lab which
provides a user-friendly interface for maintaining these notebooks. Following are the steps to install it:
As always, start by activating the conda environment if you haven’t already:
$ # Replace my-env-name with the name of your environment
$ conda activate my-env-name
Install jupyter-lab from conda
$ conda install -c conda-forge jupyterlab
Once installed, run using
$ jupyter-lab
Quantify#
Qblox provides an additional open-source software stack, Quantify, to control experiments on Qblox hardware. It is intended as a high-level interface to the Qblox hardware and contains frameworks to run quantum computing experiments from scratch.
Note
Please make sure that you install Quantify in the same virtual environment as qblox-instruments (see Installation).
Quantify is built on top of QCoDeS for handling various instruments and is split up into two packages:
quantify-core (installation and documentation) is a data acquisition platform offering easy measurement control and data handling,
quantify-scheduler (installation and documentation) translates high-level descriptions of quantum gates or pulse sequences into programs that can be uploaded and run on Cluster devices.
Please refer to the linked pages above for more information and installation instructions.
Connecting to a Cluster#
In this section we will explain how to connect a Qblox Cluster to your host PC.
Connecting to a single system#
As an example, we will consider a setup composed of:
A laptop (host PC) with an Ethernet port,
A Qblox Cluster, configured to use the default IP configuration
192.168.0.2/24.
The following steps will allow you to successfully connect the cluster to your local network:
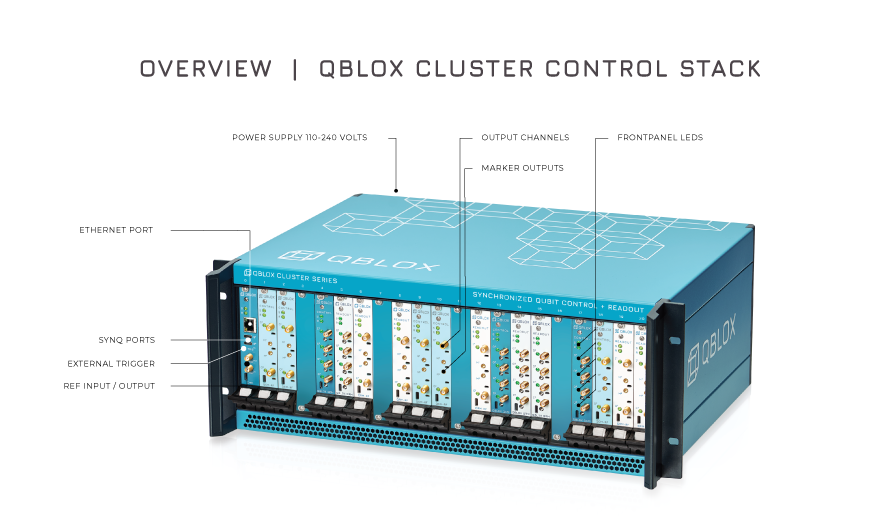
Connect the Cluster to your host PC using an Ethernet cable. For a Cluster, the ethernet port is located on the Cluster Management Module (CMM), i.e. module 0, of the cluster.
Power up the device. The device is ready when all LEDs are on and no LEDs are red (see Frontpanel LEDs).
Configure the network adapter of the host PC, so that its IP address is within subnet
192.168.0.X(whereXis in a range from 3 to 254). Make sure the subnet mask is set to255.255.255.0.Common mistake
A common mistake is to configure your host machine’s IP address to be the same as the device you want to control. This will cause IP address collision and you will not be able to connect to your device. It is recommended to choose a relatively high number in your subnet (e.g.
192.168.0.200) to avoid collisions.Note
Configuration of a network adapter varies slightly between operating systems. See section Network adapter configuration for a Windows, Linux, and MacOS description.
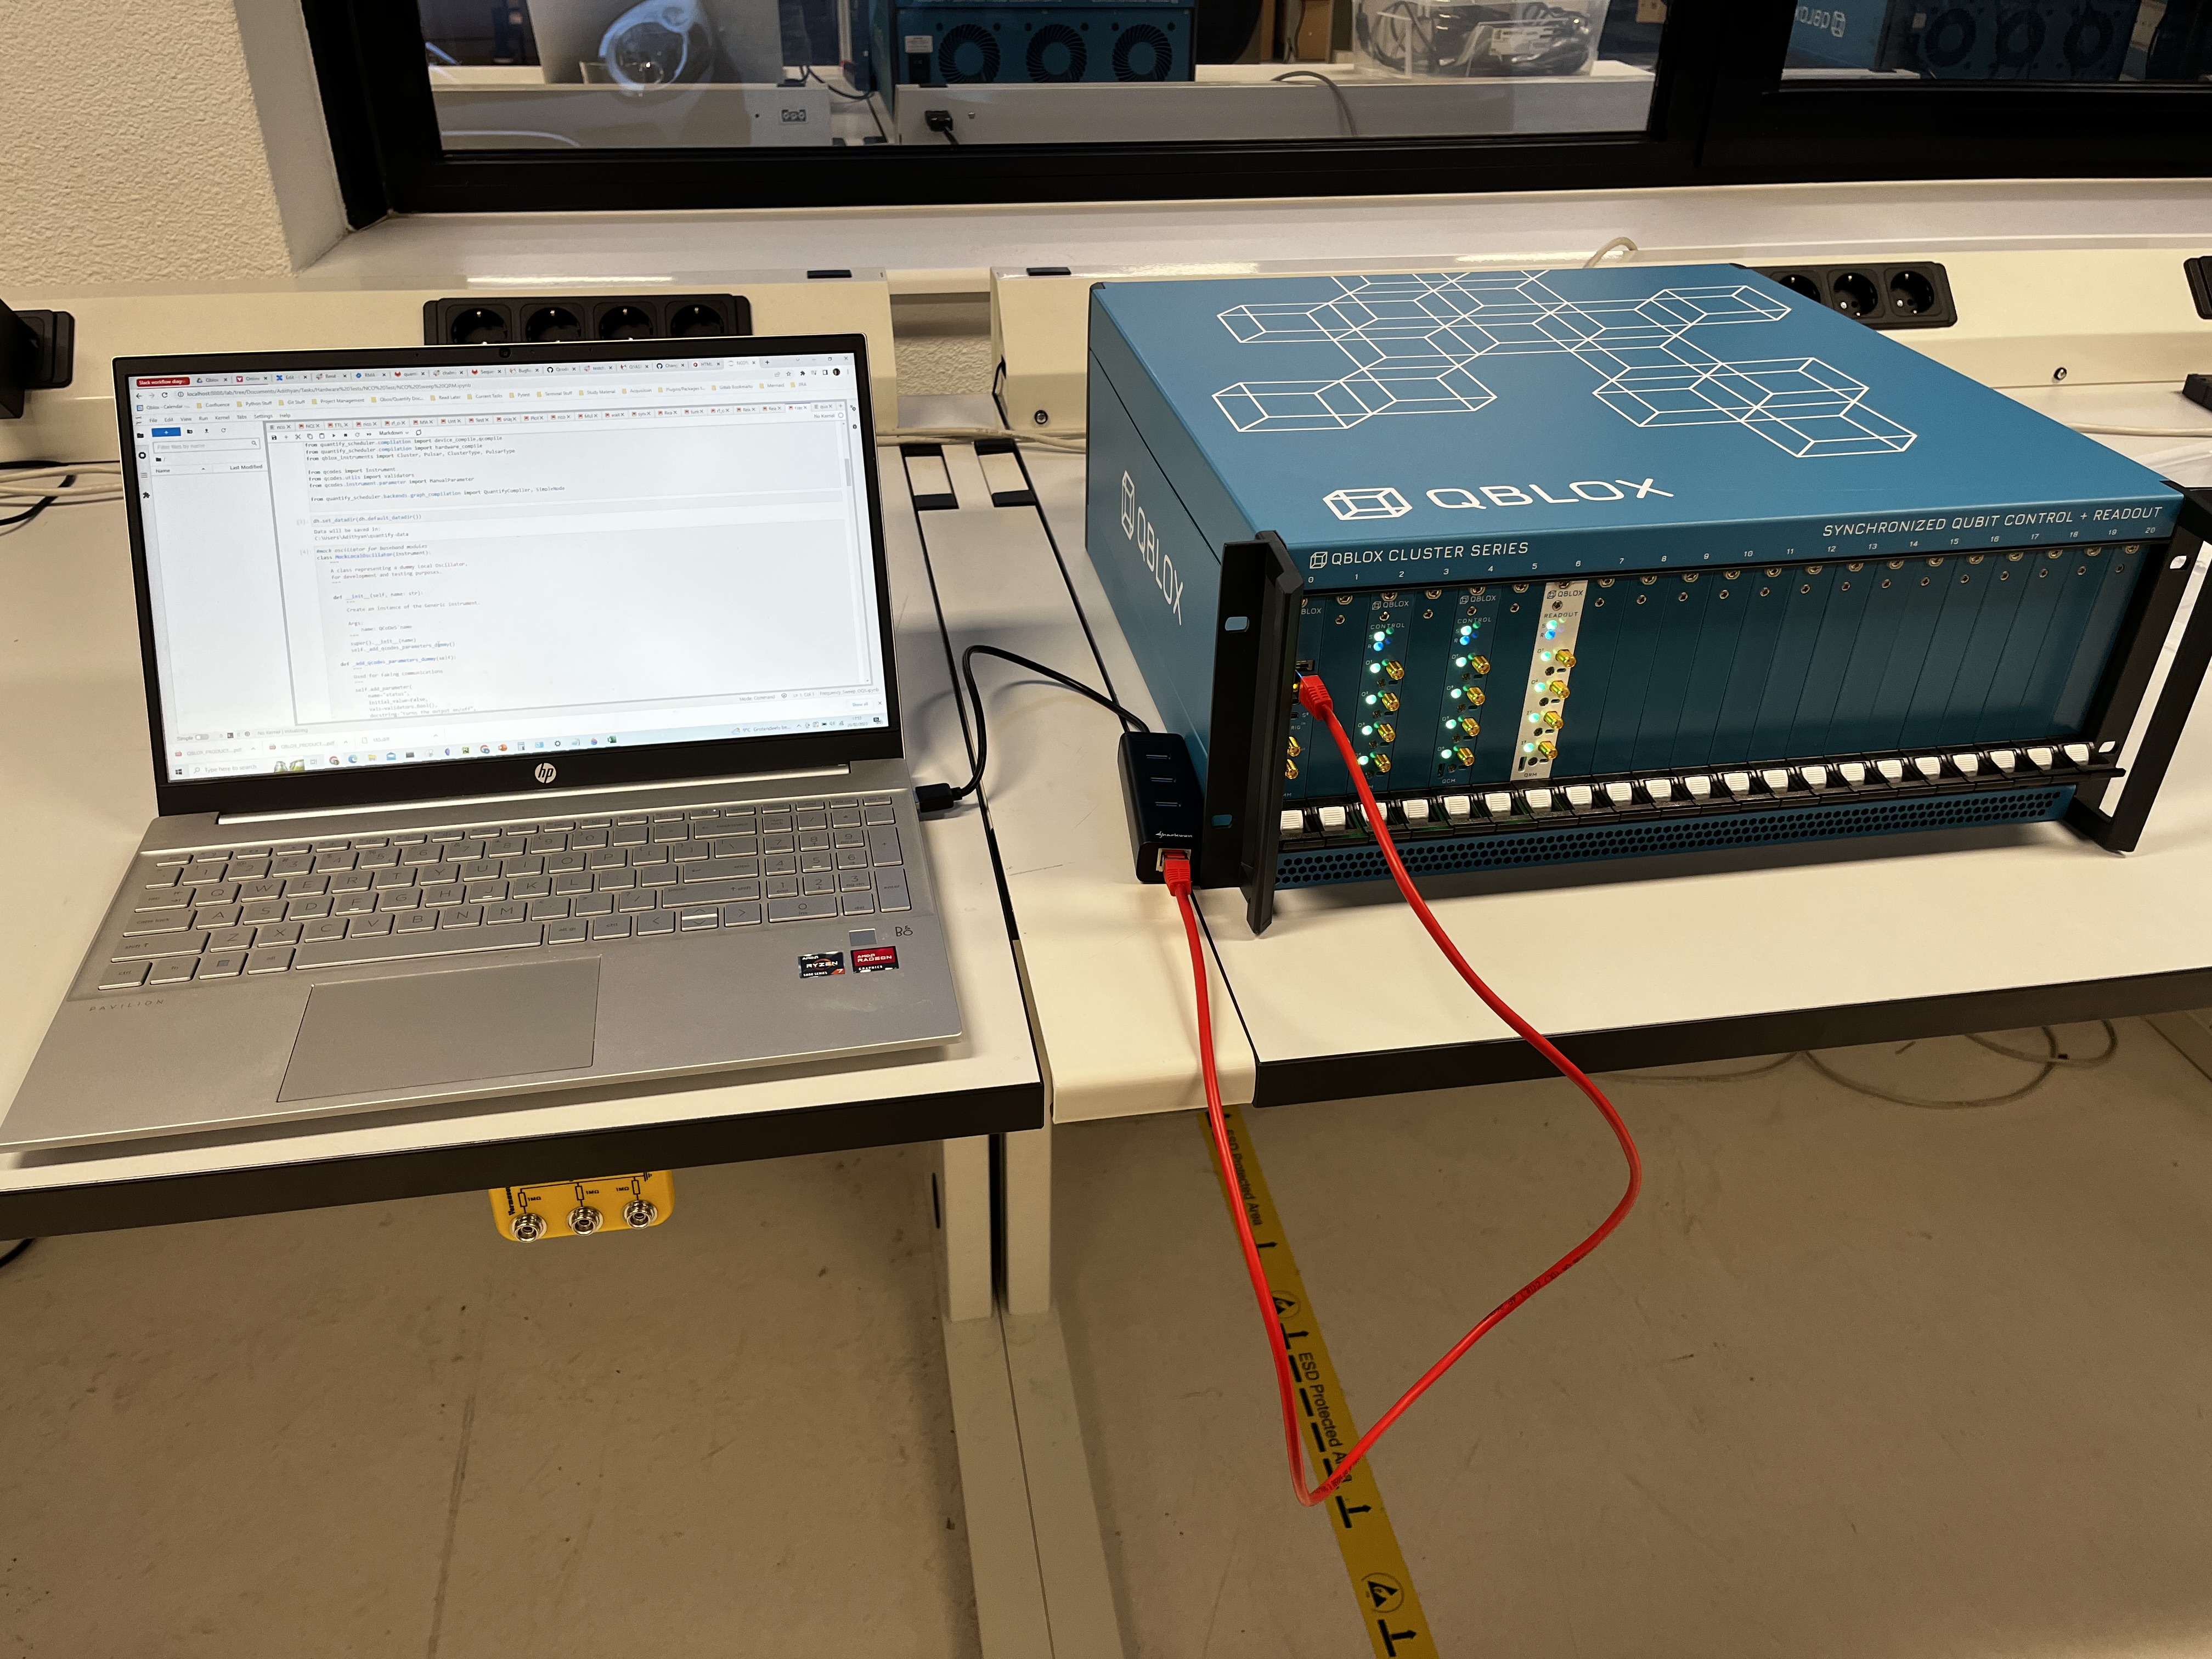
At this point, your setup will look similar to the example setup in the figure below:
After a few seconds, your device should be present on the local network. You can verify this by executing the following command in a terminal of your choice.
Note
The default IP address of the modules is
192.168.0.2. Replace the IP address of any following instruction accordingly if the IP address of the module was ever changed. See section Finding the IP address of a module in case you do not know the IP address.$ ping 192.168.0.2 # Press Ctrl + C to terminate the program
If successful, the output should be similar to the following example output:
PING 192.168.0.2 (192.168.0.2): 56 data bytes
64 bytes from 192.168.0.2: icmp_seq=0 ttl=64 time=0.396 ms
64 bytes from 192.168.0.2: icmp_seq=1 ttl=64 time=0.232 ms
64 bytes from 192.168.0.2: icmp_seq=2 ttl=64 time=0.261 ms
Finally, connect to the module from your host PC by running the following snippet in an interactive Python shell or Jupyter Notebook:
Cluster:
# Import driver
from qblox_instruments import Cluster

# Connect to module
cluster = Cluster("cluster", "192.168.0.2")
Tip
Close the connection to the module using
cluster.close().
To verify that you are connected to the correct instrument, please see the verification section below.
Note
The Frontpanel LEDs provide a quick way to check the status of your instrument after connection and during experiments. In case of an unexpected LED color, please refer to the Troubleshooting. section of the Qblox documentation website.
Connecting to multiple instruments#
To be able to control multiple instruments we need to follow the steps described above, except now:
Instead of connecting a system directly to the Ethernet adapter of the host PC, we will connect all the systems and the host PC to the same network using, for example, an Ethernet switch.
The IP address of the systems must be changed to avoid IP collisions. See section IP address and name for further instructions on updating the IP address of the modules.
As an example, we will consider a setup composed of:
A laptop (host PC) with an Ethernet port,
At least two Cluster instruments,
A network switch.
The following Python code lets us connect to the instruments in the example setup:
# Import driver
from qblox_instruments import Cluster

# Connect to module
cluster_0 = Cluster("cluster_0", "192.168.0.2")  # This cluster uses the default IP address.
cluster_1 = Cluster("cluster_0", "192.168.0.3")  # This cluster's IP address was changed.
Note
When using multiple instruments in your setup, you might need to synchronize the in- and outputs of these participating instruments. See the page Synchronization to learn how to do this.
Finding the IP address of a module#
The most robust way to address any instrument connected via Ethernet is to configure it using a static IP address and then use that address directly. As we’ve seen in earlier sections, Clusters ship with IP address 192.168.0.2 by default, expecting to be in the 192.168.0.0/24 subnet. However, having to remember IP addresses is not very user-friendly, and if the instruments are to be connected through an existing network, static IP addresses may not even be an option: most networks use DHCP to automatically configure the IP addresses of the endpoints connected to it. In the latter case, ask your system administrator to be sure.
If you have to use DHCP, or just don’t want to have to hardcode IP addresses into your notebooks, you have two options, but both put some requirements on your network infrastructure:
Addressing instruments by their name or serial number using Qblox Plug & Play. This will only work when your PC is in the same subnet as the instruments, which is the case if, e.g., you are in the same Local Area Network (LAN). It will not work if there is a router or VPN in between. You can find all instruments addressable in this way by executing
qblox-pnp list, which will show the IP addresses, names, and serial numbers:$ qblox-pnp list Devices: - 192.168.0.3: CLUSTER QRM 0.5.0 with name "test" and serial number 00013_2120_003Qblox Plug & Play is also available through its Python API, which can be used as follows.
from qblox_instruments import PlugAndPlay

with PlugAndPlay() as p:
    p.print_devices()
Addressing instruments by their hostname via (local) DNS. This requires DHCP and a router with local DNS support. Note that most consumer-grade routers don’t support this, but enterprise hardware usually does.
These four types of addresses (IP address, name, serial number, and DNS hostname) are collectively referred to as device identifiers. They are internally resolved via the resolve() function; refer to its API documentation for the complete syntax supported by it. Both qblox-cfg and the Cluster instrument drivers in Python support all types of identifiers.
Verifying which instrument you’re connected to#
Once you have a connection, you might want to ensure that you’re connected to the right instrument.
You can do this with the identify() method on an instrument connection object: calling this will make the module blink its front-panel LEDs for a few seconds.
You can do the same from the command line using qblox-pnp identify <name-or-serial-number>.
Alternatively, if you’re not physically near the instrument but you do know what its name is supposed to be, you can use the get_name() method to retrieve it from an open connection.
Renaming instruments#
The Cluster devices come pre-programmed with a default name cluster-cmm.
You can change the name using set_name() in Python, or using the set-name subcommand of qblox-cfg (see IP address and name).
Instrument names may be any single line of characters not including backslashes or underscores.
Warning
Instrument names are case sensitive, so be aware that an instrument named A is different from an instrument named a.
Host names have more stringent requirements. They must be lowercase, at most 63 characters long, and besides letters and numbers only the - (dash) is allowed. If you want to use local DNS, make sure that you configure a name that complies with these rules to avoid confusion. If you configure a name that isn’t a valid hostname, the instrument will change its hostname to a best-effort representation of the invalid name.
Note
Name changes go into effect immediately for resolution via Qblox Plug & Play, but the hostname will only change after you reboot the instrument.
That’s it! You are all set to start playing around with the Cluster hardware! We would recommend starting with the tutorials available on this website (Continuous waveform mode) to get acquainted with the Python interface.
Connecting to an SPI Rack#
In this section we will explain how to setup a Qblox SPI Rack and connect it to your PC.
Connecting to power#

The recommended way to connect the SPI Rack to power is by connecting it via a gyrator to mains in parallel to a battery. This will ensure the system remains powered and stable, the gyrator prevents interference signals such as 50 Hz from getting to the SPI Rack by mimicking a large (~40H) inductor.

Note
Please ensure there is a minimum of 1 meter between the gyrator and its power supply to effectively prevent interference signals from getting to the SPI Rack. Also, ensure that the SPI Rack is not mounted in the same 19-inch rack with line-powered equipment, this includes the gyrator power supply.
Connecting to PC#
First, make sure a C1b controller module is fully inserted in the leftmost slot of the SPI Rack. Then, connect the C1b to a C2 SPI Isolator box via a display port cable. Now, connect the C2 SPI Isolator box via USB to your PC. Finally, make sure the power switch on the back of the SPI Rack is in the on position, and the power supply is switched on as well. The LED on the C1b module should now turn on.

On Windows systems, the SPI rack will now show up as a COM port in Windows Device Manager, while on OSX and Linux systems, it will show up in the /dev/ directory as /dev/ttyUSB#, /dev/ttyS# or /dev/cu# (where # is a number). Please note down the COM port or /dev address as we will use it later.
We can now connect to the SPI Rack via the QCoDeS driver provided through the qblox-instruments package (see section Installation).
Communicating with the SPI Rack#
Starting the communication with the SPI Rack is done by simply instantiating an instance of the driver:
from qblox_instruments import SpiRack
# Replace COM4 with the port that your SPI rack is connected to.
# On OSX and Linux systems, this will be of the form /dev/tty## or /dev/cu##
spi = SpiRack('SPI Rack', 'COM4')
SPI Modules#
To use an SPI Rack module, simply slide the module into one of the slots of the rack and fasten the screws. You should feel them “click” into place. The address on which to connect to the module is written on a sticker on the side of the module itself. For each of the modules we intend to use, we should add to the driver. This is done simply by:
spi.add_spi_module(2, "S4g") # example for an S4g on address 2